
While browsing Pinterest, I came across an interesting bag designed by Kyle Mosholder of D’Emploi in Brooklyn. Essentially, his project takes a standard U.S. military top-loading duffel bag and reduces its (quite massive) volume to a more manageable level for everyday use. It’s a fun and cheap bag to make.
The instructions for this bag originally appeared in ReadyMade magazine. Sadly, ReadyMade is no more and their website is no longer available. So I used the Wayback Machine (an internet archive website) to recover Mr. Mosholder’s original instructions. You can read them here.
I originally set out to make my own copy of Mr. Mosholder’s bag. Ater tearing apart my duffel, however, I realized I had probably bitten off more than I could chew. I have only the most basic sewing knowledge and wasn’t really sure how to sew some of the pieces back together.
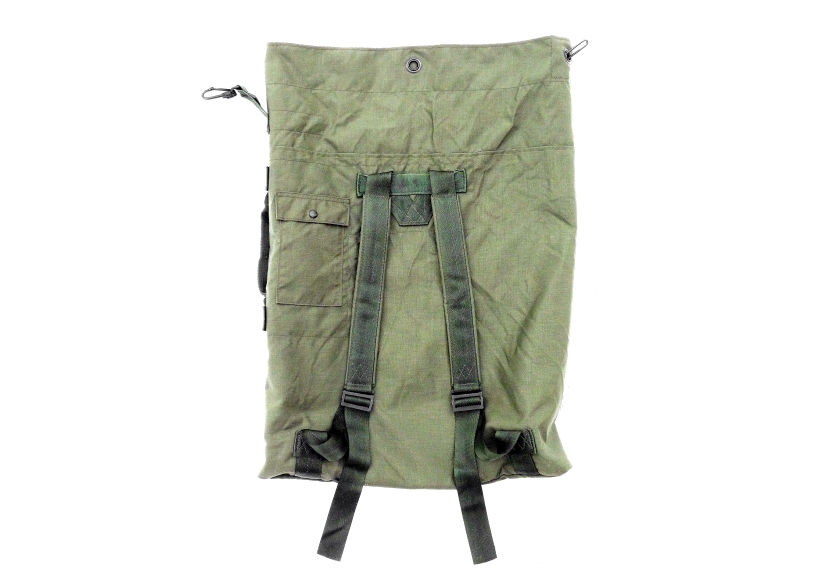
So I created my own version of the bag. The bag I made is of the basic envelope-style. To help you visualize its construction, it’s essentially a pillowcase with straps and a closure on one end. By contrast, the original duffel was barrel-shaped and much, much larger.
My bag measures 22.25” wide by 31.5” tall. It’s very roomy — in fact, much too roomy for a daily use backpack. But I think this bag would make a fine portage pack (canoe bag). I found that you can give my bag some form by opening up a closed-cell foam sleeping pad inside and stuffing your gear in the middle. So it could be used for hiking and camping as well, provided you don’t overload it with heavy items.
You could easily make this bag smaller by decreasing the bag’s width before sewing up the vertical seam in Step 5. In fact, II’m currently experimenting with a much narrower rolltop design. I’ll let you know how it goes!
Now for the instructions:
Materials
- Used military surplus duffel bag with shoulder straps
- Heavy thread (polyester or nylon) in a coordinating color
Tools
- L-Shaped Ruler
- Rotary cutter
- Cutting mat
- Seam ripper
- Tape measure
- Sewing machine
- Lighter
Instructions
- Find a nice duffel. One that is in like-new condition is best. Many of the bags on the market have bottoms covered with thick, ugly paint with soldier and unit markings. These are okay, as the bottom panel will be completely removed from the bag.
- Cut the top of the bag completely off using a straightedge and rotary cutter. Make this cut approximately 1.5 inches above the shoulder straps. Caution: Before making this cut, reach inside the bag and pull out the interior rain flap. If you don’t pull it out, you’ll likely cut a chunk of it off (like I did).
- Take a lighter and lightly run it over across the edge of the bag where you just made your cut. The nylon canvas used to construct these bags is very tough but tends to fray. Melting the edge of the fabric will help prevent this. Repeat this step for all unfinished seams in this project.
- Turn bag inside out. Undo the seam opposite the shoulder straps using a seam ripper. When you’re finished, continue on and remove the bottom panel completely.
- Remove excess height by shortening the top piece cut off during Step 2 (the amount is up to you). I made my cut 1.5″ below the clasp that closes the top of the bag.
- Sew up the bag’s vertical (long) seam you ripped out in Step 3.
- Lay the bag flat with the shoulder straps facing you. Center the shoulder straps and pin the bottom of the bag to keep them centered. Flip the bag inside out and sew the bottom seam.
- Save your scraps for repairs you may need to make in the future.
A few finals notes:
The modern top-loading nylon duffel bag comes in two basic forms. The most recent features tablar-style shoulder strap buckles. This version also comes with extra stitching along the top of the bag’s shoulder strap reinforcement webbing — a very critical place to have extra stitching!
The older style features clincher-style shoulder strap buckles and no reinforcement stitching. If you have this bag, you will want to reinforce this area when you have your bag completely apart (that is, sometime before Step 5).
Finally, I constructed my bag using only plain seams, however you could use more elaborate seams if you wanted to.
That’s it! Have fun, and go on a nice trip!
Images and text copyright 2015 Alex Snyder
